Welcome to Excel Avon
Worksheet Attributes in VBA
In this article we are going to explain some topics like how to add new sheet in excel VBA, how to rename sheet, how to delete sheet, select sheet, activate sheet, change sheet tab color, how to copy sheet. Worksheet is basically an object in VBA.
Add new sheet in excel VBA
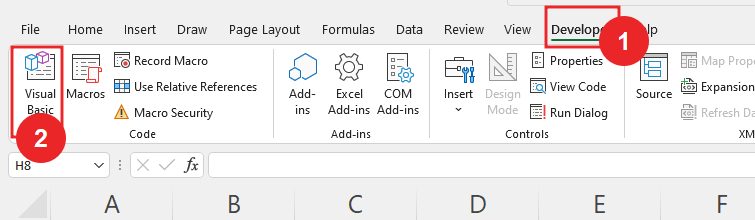
This is one of the worksheet attributes. We will add sheet here with the help of VBA. So first we will go to developer tab and then click in visual basics option.
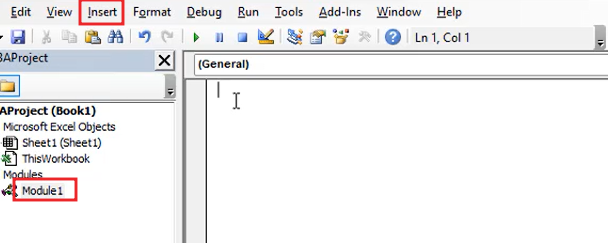
Now we will go to the Insert Tab and insert the Module.
Type command add sheet in the editor.
Sub Worksheet_VBA()

End Sub
Define the WS as a Worksheet
Sub Worksheet_VBA()
Dim WS As Worksheet
End Sub
Write Add Worksheet comments
Sub Worksheet_VBA()
Dim WS As Worksheet
'Add Worksheet

End Sub
Now I will add Sheet
Sub Worksheet_VBA()
Dim WS As Worksheet
'Add Worksheet
Worksheets.Add

End Sub
Press F5 or Run the button to run this code, by default its adds before of Active Sheet.

Now I will Add sheet Before active sheet
Sub Worksheet_VBA()
Dim WS As Worksheet

'Add Worksheet
Worksheets.Add Before:= Activesheet
End Sub
Press F5 or Run the button to run this code, you can see that the sheet has been added in front of the active sheet.
Now I will Add Sheet After ActiveSheet
Sub Worksheet_VBA()
Dim WS As Worksheet

'Add Worksheet
Worksheets.Add After:= Activesheet
End Sub
Press F5 or Run the button to run this code, you can see that the sheet has been added in After of the active sheet.
Now I will add Sheet with Variable ‘WS’
Sub Worksheet_VBA()
Dim WS As Worksheet

'Add Worksheet
Set WS = Worksheets.Add (After:= Activesheet)
End Sub
Press F5 or Run the button to run this code, you can see that the sheet has been added in After of the active sheet.

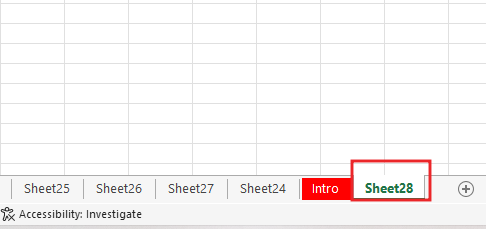
Now I will add sheet to sheet
Sub Worksheet_VBA()
Dim WS As Worksheet

'Add sheet To Last
Set WS = Worksheets.Add (After: = Worksheets(worksheets.count))
End Sub
Press F5 or Run the button to run this code, you can see that the sheet has been added in Last.
How to Rename Sheet
This is Second in worksheet attributes. Many times, we have a Sheet available, we have to it rename, so let’s see how we can rename.
Type command Rename sheet in the editor.
Sub WorkSheet_VBA()

End Sub
Define the WS as a Worksheet
Sub Worksheet_VBA()
Dim WS As Worksheet

End Sub
Write Rename sheet as comments.
Sub Worksheet_VBA()
Dim WS As Worksheet
'Rename Sheet

End Sub
Now I will Rename Sheet with Variable ‘WS’
Sub Worksheet_VBA()
Dim WS As Worksheet
'Rename Sheet
Set WS Worksheets(3)

End Sub
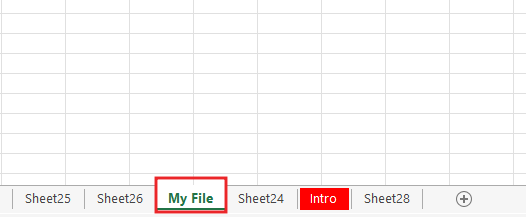
Use Sheet Function with Name, here WE are choosing “My Sheet”
Sub Worksheet_VBA()
Dim WS As Worksheet
'Rename Sheet
Set WS Worksheets(27)
ws.Name= "My Sheet"
End Sub
Press F5 or Run the button to run this code, you can see that the sheet(27) has been rename “My File”.
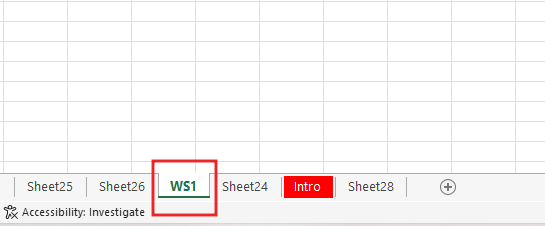
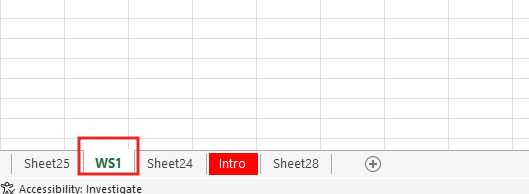
Now I will rename Sheet “My Sheet” to “WS1”
Sub Worksheet_VBA()
Dim WS As Worksheet

'Rename Sheet
Set WS Worksheets(My File)
ws.Name= "WS1"
End Sub
Click on the Run button to run this code, you can see that the sheet (My File) has been rename “WS1”.
How to delete worksheet
This is Third in Worksheet Attributes. Type command delete sheet in the editor.
Sub WorkSheet_VBA()

End Sub
Define the WS as a Worksheet
Sub Worksheet_VBA()
Dim WS As Worksheet

End Sub
Write Delete sheet as comments.
Sub Worksheet_VBA()
Dim WS As Worksheet
'Delete Sheet

End Sub
Use Delete Function
Sub Worksheet_VBA()
Dim WS As Worksheet

'Delete Sheet
Set WS = Worksheets(2)
WS.Delete
End Sub
Click on the Run button to run this code, after clicking run button we will get a pop-up window with option of delete and cancel.
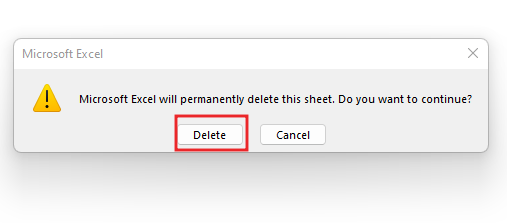
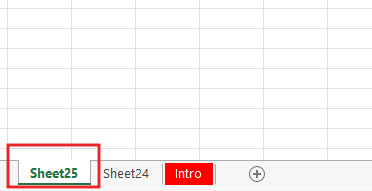
Click on delete button and finally Deleted sheet26.
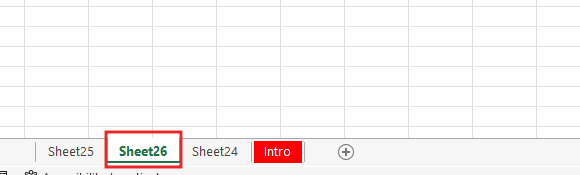
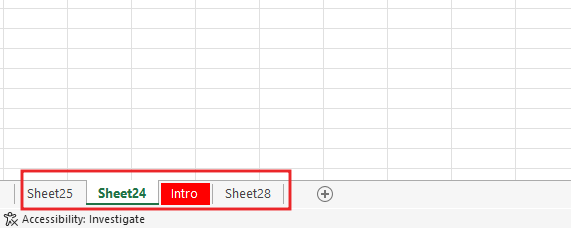
Now again we will delete WS1 sheet, so change the Worksheet in Code
Sub Worksheet_VBA()
Dim WS As Worksheet

'Delete Sheet
Set WS = Worksheets("WS1")
WS.Delete
End Sub
After clicking run button we will get a pop-up window with option of delete and cancel.
Click on delete button, and you Can see sheet WS1 Deleted.
For turning off Popup Window, use Display alert as False, But When It’s true so you receive a confirmation pop-up.
Sub Worksheet_VBA()
Dim WS As Worksheet

'Delete Sheet
Set WS = Worksheets("Sheet24")
Application.Displayalert = False
WS.Delete
Application.Displayalert = True
End Sub
How To select sheet
This is Fourth in worksheet Attributes. Here we are going to tell how to select the sheet. We will select any then we will write this code but in the code we will write that sheet in which we have to go from run code. As we have written intro it means when the code will run then we have to select the intro sheet.
Sub Worksheet_VBA()
Dim WS As Worksheet

'Select Sheet
Set WS = Worksheets("Intro")
WS.Select
End Sub
Press F5 or Run the button to run this code, you can see that the Intro sheet has been selected. you can see the image below
How To Activate sheet
This is fifth in worksheet Attributes. In Activate, we see that after running the code to activate the sheet we choose, we get that sheet activated in Excel. In this command and define will be same. Okay I will use code. Manually we have activate sheet24.
Sub Worksheet_VBA()
Dim WS As Worksheet

'Activate Sheet
Set WS = Worksheets("Intro")
WS.activate
End Sub
Press F5 or Run the button to run this code, you can see that the Intro sheet has been activated. you can see the image below.
How to Change Sheet Tab Color
This is Sixth in worksheet Attributes. Here we have to choose the color of the tab which will be decided by RGB which means Red Green Blue, we have to fill all the integer values in it whose color will be made.
Sub Worksheet_VBA()
Dim WS As Worksheet

'Tab Color
Set WS = Worksheets("Intro")
WS.Tab.Color= RGB(110, 200, 140)
End Sub
Press F5 or Run the button, you can see that the Intro tab has been colorful. you can see the image below.
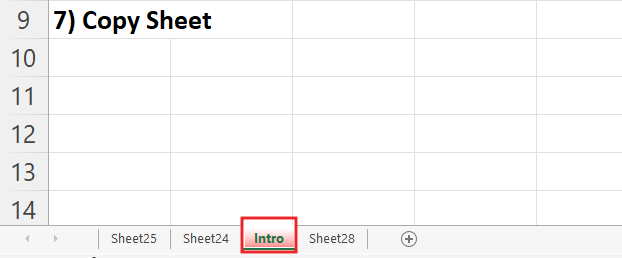
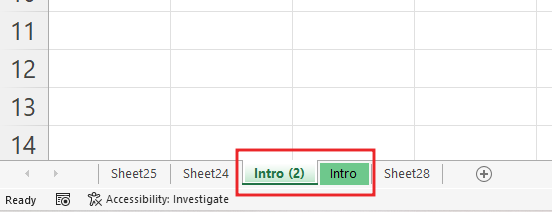
How to Copy Sheet in Excel
This is seventh in worksheet Attributes. How to use copy sheet, let’s understand it is very easy, just use copy function and copy function has two parameters after and before, and if you do not write parameter then it will be default and default one will open a new workbook.
Sub Worksheet_VBA()
Dim WS As Worksheet

'Copy sheet
Set WS = Worksheets("Intro")
WS.Copy Before: = WS
End Sub
Press F5 or Run the button, you can see that the Intro tab has been Copied. you can see the image below.
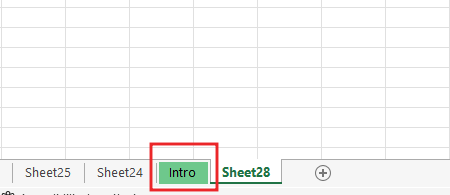
If you do after instead of before, will copy the active sheet later.
Sub Worksheet_VBA()
Dim WS As Worksheet

'Copy sheet
Set WS = Worksheets("Intro")
WS.Copy After: = WS
End Sub
Press F5 or Run the button, you can see that the Intro tab has been Copied After activesheet . you can see the image below.

So, I hope you have understood Worksheet Attributes in Excel VBA and for more information, you can follow us on Twitter, Instagram, LinkedIn, and YouTube as well.
You can also see well-explained video here

")
")