welcome to Excel Avon
How to List all files Inside a folder
DOWNLOAD USED EXCEL FILE FROM HERE>>
In today’s post, we will explain to you how to List all files Inside a folder using Excel VBA, although you can do List all files Inside a folder manually, but it may take a lot of time when you work with more data. List all files Inside a folder, we can also use VBA to do List all files Inside a folder, it will take a lot of time, no matter how much data is there. VBA allows you to list all files inside a folder, using the FileSystemObject.
Below you can see in the image, we have many files which we will list together.

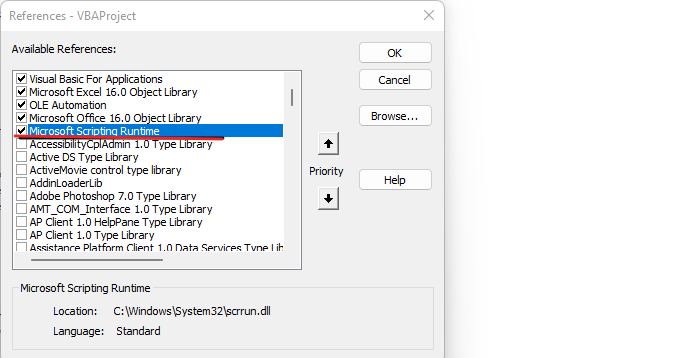
We will now activate Microsoft Script Runtime Library, to activate go to Tools option and then References and on that we select Microsoft Script Runtime Library and click OK.
How to List all files Inside a folder in VBA
Well, you might know how to do all the listing manually but how we do it in VBA, we will learn in this article. Similarly, it is easy to do in VBE also, let’s understand.
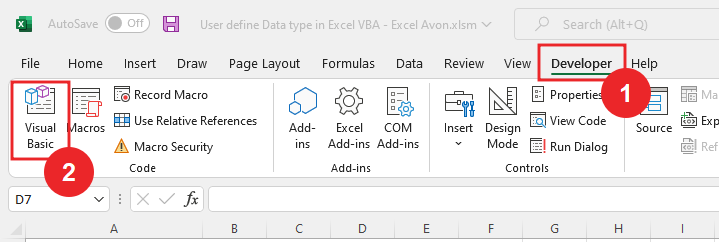
Through this post, we will know How to List all files Inside a folder with the help of VBA, then we have to go like last time, first go to the Developer Tab, then click on the option of Visual Basic as shown in the image below.
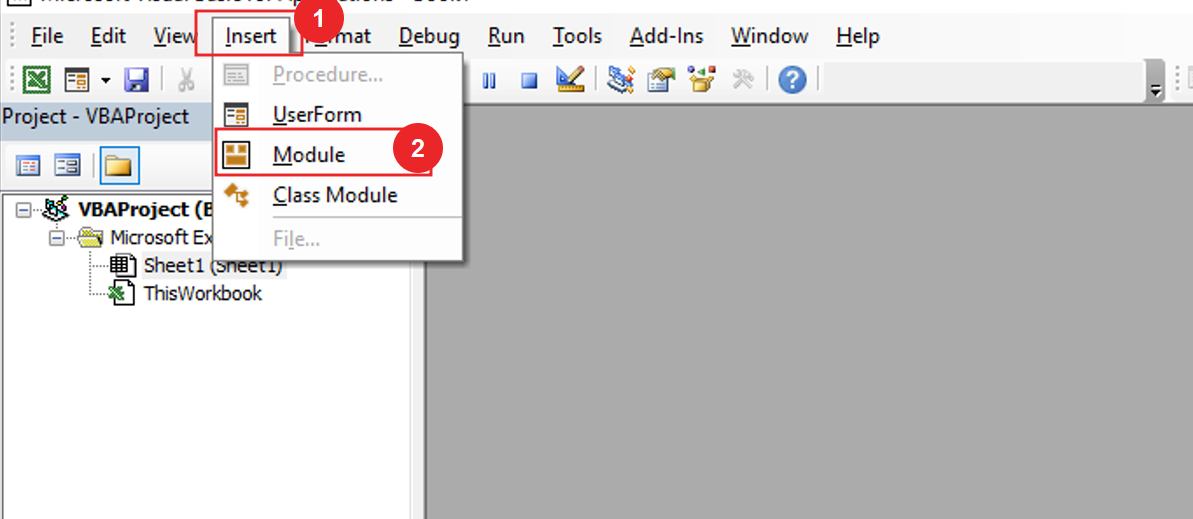
On opening in VBE, you have to go to Insert and then Module has to be inserted, as can be seen in the image.
Once we insert the module, we will write a subroutine as List All Files ().
Sub ListAllFiles()

End Sub
Declaring variables which are using in the entire project for FileSystemObject, File , worksheet, FileDiolog.
Sub ListAllFiles()
Dim FSO As New FileSystemObject
Dim aFile As File
Dim WS As Worksheet
Dim FD As FileDialog

End Sub
Now we will set worksheet as Activesheet. Codes will be applied in whichever sheet is activated.
Sub ListAllFiles()
Dim FSO As New FileSystemObject
Dim aFile As File
Dim WS As Worksheet
Dim FD As FileDialog
Dim FolPath As String

Set WS = ActiveSheet
End Sub
Now we will set File Diolog as ‘FileDiologFolderPicker‘. ‘WITH‘ statement is used in VBA to access all the properties and methods of the specified object.
Sub ListAllFiles()
Dim FSO As New FileSystemObject
Dim aFile As File
Dim WS As Worksheet
Dim FD As FileDialog
Dim FolPath As String

Set WS = ActiveSheet
End Sub
‘WITH‘ statement is used in VBA to access all the properties and methods of the specified object. Here we will name the title With (Statement) file dialog. And then Give the Button Name.
Sub ListAllFiles()
Dim FSO As New FileSystemObject
Dim aFile As File
Dim WS As Worksheet
Dim FD As FileDialog
Dim FolPath As String

Set WS = ActiveSheet
Set FD = Application.FileDialog(msoFileDialogFolderPicker)
With FD
     .Title = "Choose a Folder"
     .ButtonName = "Choose"
End With
End Sub
Create condition with if statement for show, creating another condition with if statement (If the number of select item is more than 0 even 1).
Sub ListAllFiles()
Dim FSO As New FileSystemObject
Dim aFile As File
Dim WS As Worksheet
Dim FD As FileDialog
Dim FolPath As String

Set WS = ActiveSheet
Set FD = Application.FileDialog(msoFileDialogFolderPicker)
With FD
    .Title = "Choose a Folder"
    .ButtonName = "Choose"
    If .Show = True Then
       If .SelectedItems.Count > 0 Then
       End If
    End If
End With
End Sub
Another variable defines for string (FolPath), and we should have 1 in the select item of FolderPath.
Sub ListAllFiles()
Dim FSO As New FileSystemObject
Dim aFile As File
Dim WS As Worksheet
Dim FD As FileDialog
Dim FolPath As String

Set WS = ActiveSheet
Set FD = Application.FileDialog(msoFileDialogFolderPicker)
With FD
    .Title = "Choose a Folder"
    .ButtonName = "Choose"
    If .Show = True Then
       If .SelectedItems.Count > 0 Then
           FolPath = .SelectedItems(1)
       End If
    End If
End With
End Sub
Condition with if statement on the condition that FolderPath is not blank. and ‘For Each’ signifies that for each entity in an array or the range repeat the process in for loop. We will use the ‘next’ keyword to move forward in the range. For range in loop, we will use fileSystemobject.
Sub ListAllFiles()
Dim FSO As New FileSystemObject
Dim aFile As File
Dim WS As Worksheet
Dim FD As FileDialog
Dim FolPath As String

Set WS = ActiveSheet
Set FD = Application.FileDialog(msoFileDialogFolderPicker)
With FD
    .Title = "Choose a Folder"
    .ButtonName = "Choose"
    If .Show = True Then
       If .SelectedItems.Count > 0 Then
           FolPath = .SelectedItems(1)
       End If
    End If
End With

If FolPath <> "" Then
   For Each aFile In FSO.GetFolder(FolPath).Files
 Next aFile
End If
End Sub
Now we will declare the last row. Copy the range of the worksheet.
Sub ListAllFiles()
Dim FSO As New FileSystemObject
Dim aFile As File
Dim WS As Worksheet
Dim FD As FileDialog
Dim FolPath As String

Set WS = ActiveSheet
Set FD = Application.FileDialog(msoFileDialogFolderPicker)
With FD
   .Title = "Choose a Folder"
   .ButtonName = "Choose"
   If .Show = True Then
      If .SelectedItems.Count > 0 Then
         FolPath = .SelectedItems(1)
      End If
   End If
End With

If FolPath <> "" Then
   For Each aFile In FSO.GetFolder(FolPath).Files
       lr = WS.Range("A" & Rows.Count).End(xlUp).Row + 1
   Next aFile
End If
End Sub
We have separated columns for files attributes, whose range we have to write with the worksheet.
Sub ListAllFiles()
Dim FSO As New FileSystemObject
Dim aFile As File
Dim WS As Worksheet
Dim FD As FileDialog
Dim FolPath As String

Set WS = ActiveSheet
Set FD = Application.FileDialog(msoFileDialogFolderPicker)
With FD
    .Title = "Choose a Folder"
    .ButtonName = "Choose"
    If .Show = True Then
       If .SelectedItems.Count > 0 Then
          FolPath = .SelectedItems(1)
       End If
    End If
End With

If FolPath <> "" Then
   For Each aFile In FSO.GetFolder(FolPath).Files
       lr = WS.Range("A" & Rows.Count).End(xlUp).Row + 1
       WS.Range("A" & lr).Value = aFile.Name
   Next aFile
End If
End Sub
Now we will copy and paste the code that we have written for cell range and file attributes and change the cell range and files attributes when you paste code. As we have bolded the changed attributes.
Sub ListAllFiles()
Dim FSO As New FileSystemObject
Dim aFile As File
Dim WS As Worksheet
Dim FD As FileDialog
Dim FolPath As String

Set WS = ActiveSheet
Set FD = Application.FileDialog(msoFileDialogFolderPicker)
With FD
     .Title = "Choose a Folder"
     .ButtonName = "Choose"
     If .Show = True Then
        If .SelectedItems.Count > 0 Then
           FolPath = .SelectedItems(1)
        End If
     End If
End With

If FolPath <> "" Then
   For Each aFile In FSO.GetFolder(FolPath).Files
       lr = WS.Range("A" & Rows.Count).End(xlUp).Row + 1
       WS.Range("A" & lr).Value = aFile.Name
       WS.Range("B" & lr).Value = aFile.Type
       WS.Range("C" & lr).Value = aFile.Path
       WS.Range("D" & lr).Value = aFile.Size
       WS.Range("E" & lr).Value = aFile.DateCreated
       WS.Range("F" & lr).Value = aFile.DateLastModified
   Next aFile
End If
End Sub
When you write the code (List all files Inside a folder), you have to go to the excel sheet or activate it and there you can insert a button that will be used to run the macro. So, we will go to the insert option and then select the button, drag and select the select the macro name (‘List All Files’) from the available list and click on OK button and you can also name the button.

finally, our button is made.
If you click on the button, it will open the file in the folder where you select the folder. and then click on the choose button. You can see the title and button name of the popup window which will be your given name.

We will select a file and click on the choose button. As soon as you click the button, you will see that the information of file name, created date, folder path, file type and modified date has been filled in Excel.

So, I hope you have understood How to List all files Inside a folder using Excel VBA and for more information, you can follow us on Twitter, Instagram, LinkedIn, and YouTube as well.
DOWNLOAD USED EXCEL FILE FROM HERE>>
You can also see well-explained video here about How to List all files Inside a folder using excel VBA
")
")
")