Welcome to Excel Avon
Convert Excel Range to Html
DOWNLOAD THE USED EXCEL FILE FROM HERE>>
In today’s post, we will show you How to Convert Excel Range to Html in Excel VBA, In this post we will work with Module as we created with Module in previous post.
We told in previous post how to send email from table html in excel VBA, this post is totally different from that post, we will have data in our worksheet, which we will put in table properly, and convert this table from range to html table Will do, that too with formatting. Together means when the data will be converted into HTML, it will be with the table, something like this can be seen in the image below.
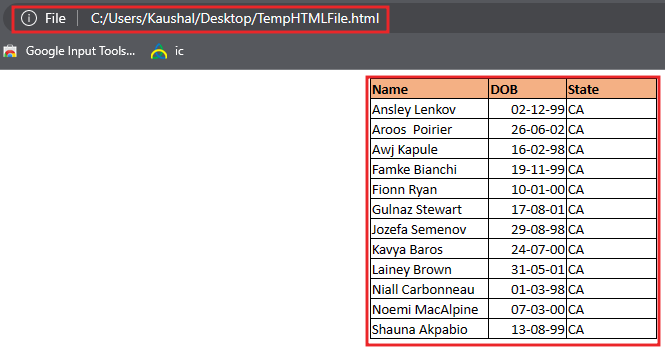
If you’ve created a beautiful Excel table and now want to publish it online as a web page, the simplest way is to convert it to a good old html file. In this article, we will learn how to convert Excel data to HTML.
How to Convert Excel Range to Html
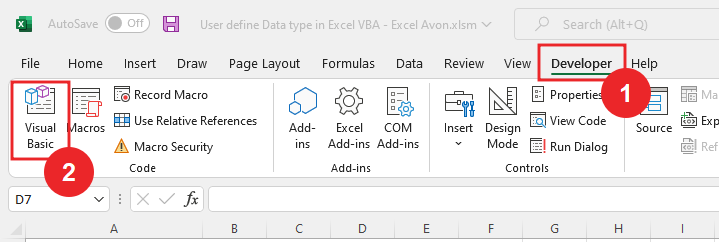
As we taught you how to insert a module when we were working with modules, as we have learned in many posts so far, you can insert modules. Let us teach you how we insert the module. Let’s understand, then we have to go like last time, first go to the Developer Tab, then click on the option of Visual Basic as shown in the image below.
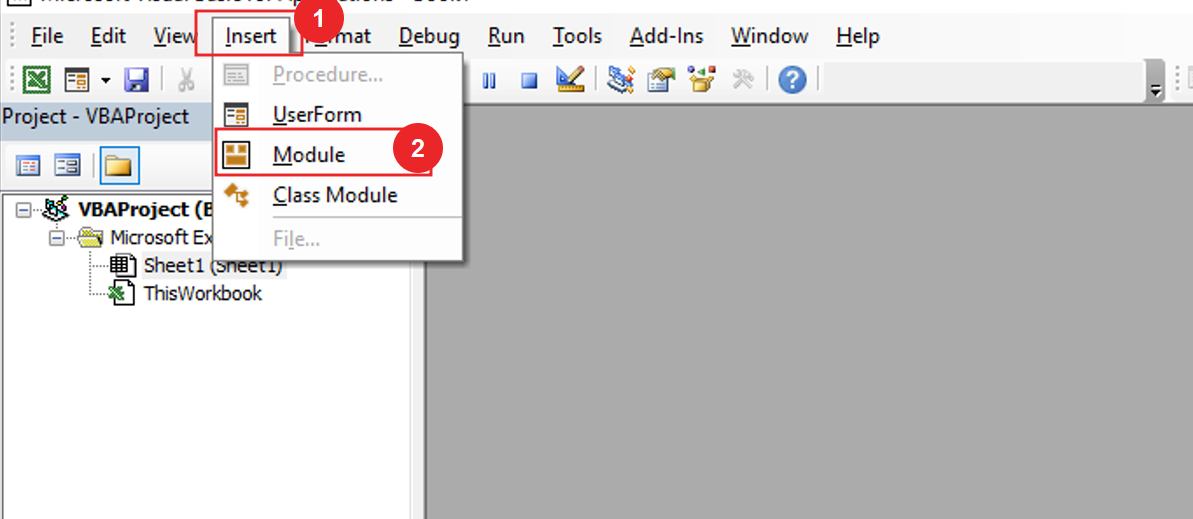
On opening in VBE, you have to go to Insert and then Module has to be inserted, as can be seen in the image.
Once the module is inserted, and the library is activated, we’ll write a subroutine to Sub ExportRngToHTML().
Sub ExportRngToHTML()
End Sub
Declare the variable i as Range. Also Declare variable for filename.
Sub ExportRngToHTML()
Dim Rng As Range
Dim fName As String
End Sub
Declare one more variable WS as Worksheet. with set worksheet as sheet1.
Sub ExportRngToHTML()
Dim Rng As Range
Dim fName As String
Dim WS As Worksheet
Set WS = Sheet1
End Sub
Also we will define pObj variable for Publish Object . Also we will define Object path variable as oPath as string.
Sub ExportRngToHTML()
Dim Rng As Range
Dim fName As String
Dim WS As Worksheet
Dim pObj As PublisbObject
Dim oPath As String
Set WS = Sheet1

End Sub
Here we will set the range of the table
Sub ExportRngToHTML()
Dim Rng As Range
Dim fName As String
Dim WS As Worksheet
Dim pObj As PublisbObject
Dim oPath As String
Set WS = Sheet1
Set Rng = WS.Range("A1:C13")
End Sub
Here we will store the object path in opath, when we store then we will use environ function. environ function is used to obtain any information present in the operating system. environ function use will get the system User Name. This function returns the file path in the file location on the return value. We will get the location of Desktop Folder.
Sub ExportRngToHTML()
Dim Rng As Range
Dim fName As String
Dim WS As Worksheet
Dim pObj As PublisbObject
Dim oPath As String
Set WS = Sheet1
Set Rng = WS.Range("A1:C13")

oPath = "C:\Users\" & Environ("USERNAME") & "\Desktop" 'Path for desktop folder

End Sub
Name the file that will be created in HTML
Sub ExportRngToHTML()
Dim Rng As Range
Dim fName As String
Dim WS As Worksheet
Dim pObj As PublisbObject
Dim oPath As String
Set WS = Sheet1
Set Rng = WS.Range("A1:C13")

oPath = "C:\Users\" & Environ("USERNAME") & "\Desktop" 'Path for desktop folder
fName = "TempHTMLFile.html"

End Sub
Now here we will set the publish object using with Publish Object Add Function, Here First parameter is SourceType so we select ‘xlSourceRange‘ another Parameter is FileName so we write ‘oPath & “\” & fName‘ , Fill the worksheet parameters, write the range of data in the source parameter,
Sub ExportRngToHTML()
Dim Rng As Range
Dim fName As String
Dim WS As Worksheet
Dim pObj As PublisbObject
Dim oPath As String
Set WS = Sheet1
Set Rng = WS.Range("A1:C13")

oPath = "C:\Users\" & Environ("USERNAME") & "\Desktop" 'Path for desktop folder
fName = "TempHTMLFile.html"
Set pObj = ThisWorkbook.PublishObjects.Add(xlSourceRange, oPath & "\" & fName, WS.Name, Rng.Address)

End Sub
Select the HTML type of the path object, here we have selected HTML static.
Sub ExportRngToHTML()
Dim Rng As Range
Dim fName As String
Dim WS As Worksheet
Dim pObj As PublisbObject
Dim oPath As String
Set WS = Sheet1
Set Rng = WS.Range("A1:C13")

oPath = "C:\Users\" & Environ("USERNAME") & "\Desktop" 'Path for desktop folder
fName = "TempHTMLFile.html"
Set pObj = ThisWorkbook.PublishObjects.Add(xlSourceRange, oPath & "\" & fName, WS.Name, Rng.Address)
pObj.HtmlType = xlHtmlStatic
End Sub
Now publish object will be published if create parameter is true.
Sub ExportRngToHTML()
Dim Rng As Range
Dim fName As String
Dim WS As Worksheet
Dim pObj As PublisbObject
Dim oPath As String
Set WS = Sheet1
Set Rng = WS.Range("A1:C13")

oPath = "C:\Users\" & Environ("USERNAME") & "\Desktop" 'Path for desktop folder
fName = "TempHTMLFile.html"
Set pObj = ThisWorkbook.PublishObjects.Add(xlSourceRange, oPath & "\" & fName, WS.Name, Rng.Address)
pObj.HtmlType = xlHtmlStatic
pObj.Publish True
End Sub
Click on Run button
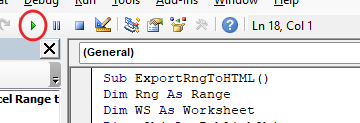
The file we created is in the desktop folder which we have given the name of the file you can see.

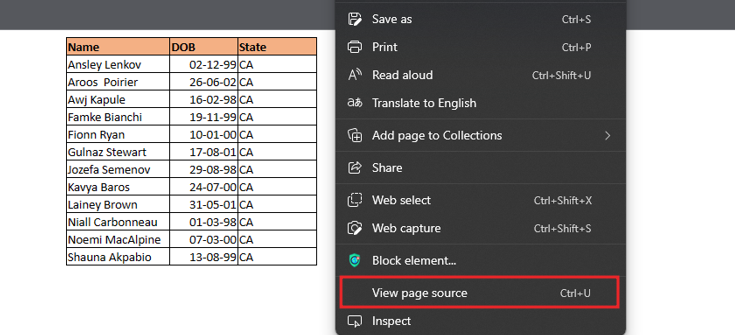
we will open the file, This table data is now converted to HTML.

Right click on web page then go to View page sources
View Html Coding after clicking on view page Source.

Therefore, I hope that you have understood How to Convert Excel Range to Html In Excel VBA, maybe if you do not understand some options, then you can comment us, which we will answer soon and for more information, you can follow us on Twitter, Instagram, LinkedIn and you can also follow on YouTube.
DOWNLOAD THE USED EXCEL FILE FROM HERE>>
You can also see well-explained video here about How to Convert Excel Range to Html In Excel VBA


